Tuesday, February 7, 2012

On the Wings of Love Tag


First off, I have to say that I had a WONDERFUL time at this year's CHA....
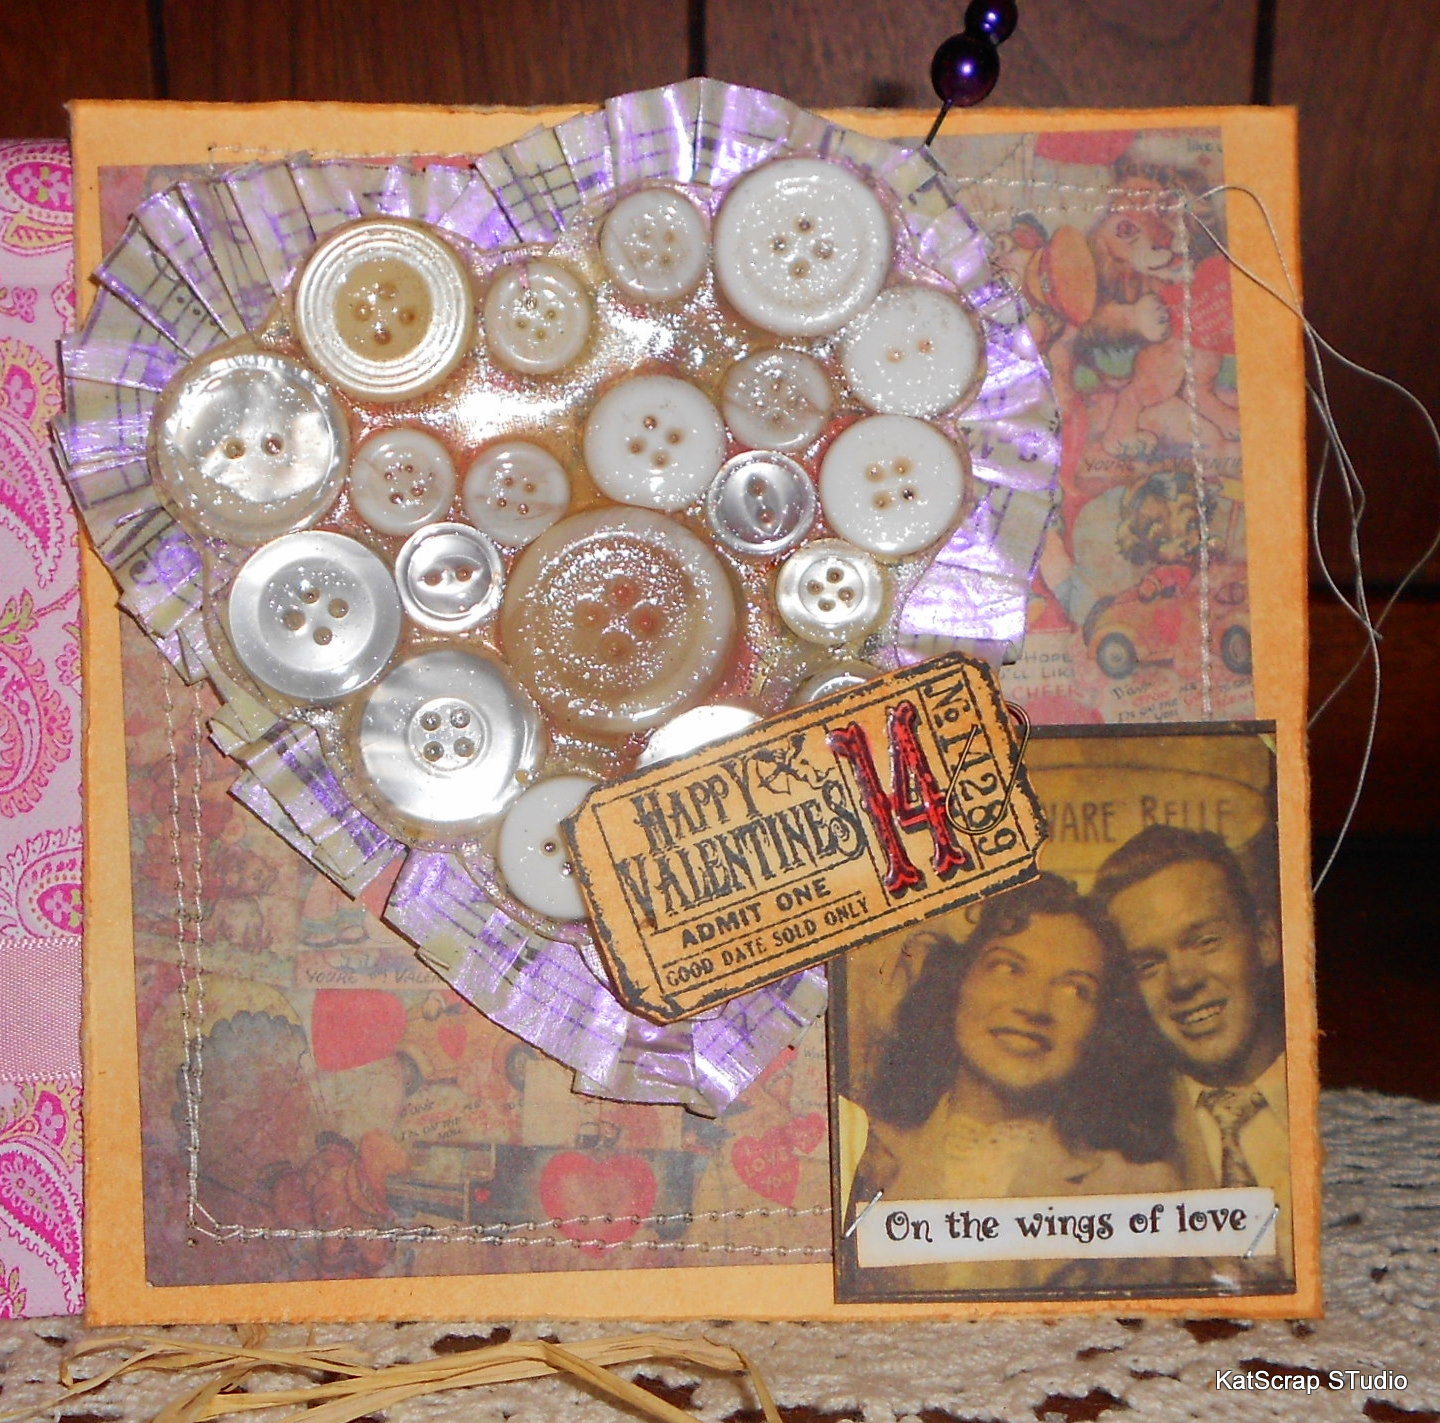
There were SO many great new products - Terri Sproul's Mixers - of course being my favorite!  I'm so filled with creative inspiration...that it was a little difficult deciding on a project for this week's post.  In keeping with the upcoming holiday, Valentine's Day, I created this tag.


This is where I started - at this point, I had no idea what I was going to do with the button heart.  I arranged the buttons in a heart shape, and then poured Crystal Lacquer over the entire surface, then sprinkled a tiny bit of Terri Sproul's Mixer in Silver for some shimmer.  The picture shows what it looked like after drying overnight and before trimming it to a heart shape.


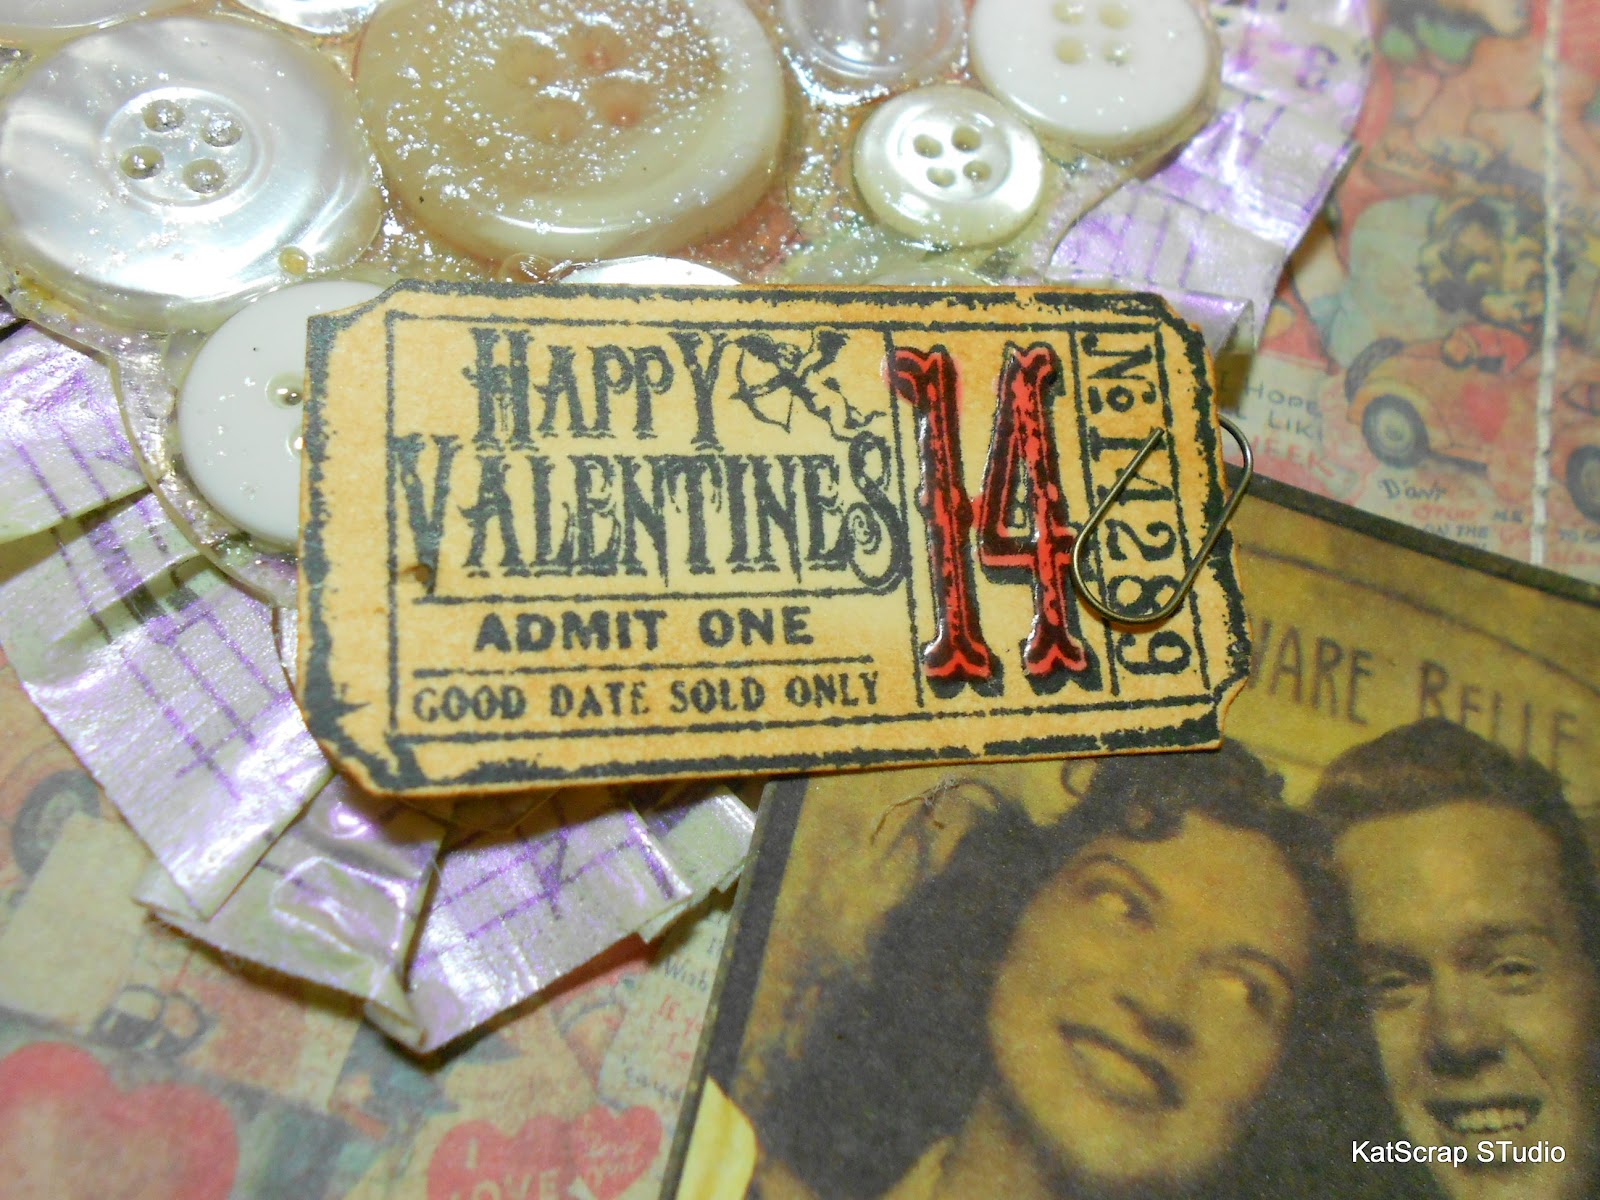
I used Tim Holtz's tissue tape to form the ruffle behind the heart, which was painted with Crystal Lacquer mixed with Terri Sproul's Mixer in Lilac Pearl.  The tag was distressed with Tea Dye distress ink and I sewed patterned paper onto it.  The tag and photo image are both Tim Holtz goodies and were also distressed with distress ink.  I attached the photo with pop dots to add a little dimension.


Here's another view that shows the Red Crystal Lacquer shining on the number 14 of the tag.  Hope you all have a very Happy Valentines Day!

Till next time.....be creative!


Check out Terri Sproul's Mixers here...you can pre-order them!

Visit the Sakura Hobby Craft Blog!


Tuesday, January 24, 2012

Mixer Magic


My project this week is literally covered with the brand new Terri Sproul's Mixer's...beautiful mica powders that can be mixed with Crystal Lacquer for some pretty amazing results.  I wanted to try it on several different surfaces to see what effects I could obtain....and what I got was really beautiful!

I started with these simple supplies:

light pink crepe paper rosette
a plain white paper flower
white plastic mini frame
a valentine cut out
a tim holtz rosette made with vintage sheet music

and I added the magic:

Terri Sproul's Mixer's in the following colors -
Red Satin
Silver
Gold Dust
Bronze


Here's a close-up of the pink crepe paper rosette with a layer of Bronze mica powder mixed with 3D Crystal Lacquer brushed on the top.   I dipped the edge in Crystal Lacquer then dipped in Gold Dust mica.


I painted Red Satin mica powder mixed with Crystal Lacquer on a white paper flower, let it dry thoroughly, then stamped it with a handwriting rubberstamp using black StazOn ink.  The little frame was white, and is coated with Silver mica powder mixed with Crystal Lacquer.  I cut the word LOVE out of white cardstock and distressed it a little before gluing it to the backside of the frame.  The little Valentine image  was distressed on the edges, coated with Distress Crackle and then brushed with a small amount of the Silver mica powder.  I layered a vintage music rosette, the Valentine image, then topped it with the frame and flower.

I'll be attending CHA this coming weekend and can't wait to see all the new products out there and visit the Sakura Craft Booth 844!

Till then.....stay creative


Tuesday, January 10, 2012

True Love tag featuring the NEW Terri Sproul Mixers!


This is my first project sharing the brand new Terri Sproul Mixer - Jewel Effects by Sakura Hobby Craft - which will be debuted at the Craft and Hobby Association 2012 Winter Conference!!  These mica powder colors are amazing and I've been having a blast playing with them!

Materials Used
Terri Sproul Mixer - Jewel Effects
Red Satin
Blue Ice Pearl
Lilac Pearl
(mixed with Crystal Lacquer)

Manila tag - size 16
scrapbooking paper
PaperClay
rubberstamps
clear embossing powder
ATC blank
min playing card
arm charms
mini paper flowers
girl & crown image printed from computer
a little bling
lace scrap
pop dots
'ck paris' font printed on white cardstock
distress ink - tea dye & vintage photo

sewing machine - off white quilting thread

This tag was a total blast to create.  I used a lot of different techniques...even got out my sewing machine to give it a little touch of whimsy vintage!


This is what I started with....keep in mind that I usually don't have a clue what my project will develop into while I'm creating and taking these pictures.  At this point I had painted on a layer of Blue Ice Pearl Terri Sproul Mixer over the stamped bird image on the paperclay.


Here's a close up of the bird image on the paperclay.  I used tea dye distress ink of the edges and printed out the word LOVE and glued it on using Crystal Lacquer.


 After roughing up the edges a bit with the Zutter Distrezz It All, I inked the edges with tea dye distress ink and ran it through my sewing machine....even sewing a little heart in the corner.


I painted inside the heart with Red Satin Terri Sproul Mixer and Crystal Lacquer and let it dry - stamped and embossed over it - then topped it with a nice layer of Crystal Lacquer and little pixie dust :)


This tiny bouquet was white originally - given a little spray with glimmer mist and then I painted the 3 light pink flowers with Lilac Pearl Terri Sproul Mixer. 

Thanks stopping by!
Have a wonderful week!

Visit www.crystallacquer.blogspot.com  for all the latest from
 Sakura Hobby Craft's Design Team!

and www.sakuracraft.com for more information about Crystal Lacquer!


Tuesday, December 27, 2011

CHEERS!


This week's project is quick and easy....and a great way to dress up your decor for any occasion! 

Materials Used


That's it!  I said it was quick and easy!


It's very important to work on a non stick work surface.  I use a craft sheet from Ranger.  I placed the pine tree sticker on the craft sheet and then went to town with my colored Crystal Lacquer.  I used 2 shades of green for the tree and a brown for the trunk and just filled in the blank areas.  I let it sit overnight.......very important here.  Once it's completely dry, it peels right off the craft sheet and almost has a vinyl window cling feel on the back.  In fact, I was able to move it several times to make sure it was straight.  This is such a great idea to turn an ordinary clear glass votive holder, wine glass, vase - virtually anything into a very nice addition to your decor or party theme.


Here are the same stickers on a votive candle holder......cute!
I added some plain gold stickers in the background for a little more interest.....love it!

Here's wishing you a very Happy New Year!

and 'till next time......stay creative!

Visit Sakura's amazing blog here

Find out about all their amazing products here


Tuesday, December 13, 2011

A Christmas Wish


Believe it or not - I created this ornament in about 30 minutes - beginning to end.  Fortunately, I had time to let it dry overnight, before it and me ran off to a Christmas party and ornament exchange..... 

Materials Used

1 vintage glittered star
white crepe paper streamer
gold and pearl glimmer mist
gold and silver find glitter
white cardstock
music rubberstamp
distress inks in vintage photo, tea dye & black soot

I was in a pinch - invited to a party & ornament exchange and make some creative goodness for my design team assignment.  I had these vintage star ornaments arranged in a glass bowl as part of my Christmas decor - and a bottle of Crystal Lacquer...what more could a girl ask for?
I made the rosette using simple white crepe paper streamers using about an arms length doubled - that took like 2 minutes!  I'm doing good!  Sprayed it with a little gold and pearl glimmer mist and hit it good with my heat gun.  Next, I poured a good amount of Crystal Lacquer on a paper plate and mixed gold and silver glitter on another.  I dipped the edge of the rosette into the Crystal Lacquer and then dipped in into the glitter mixture - so pretty!


While I set that aside to dry (it did dry in just a few hours, but I left it overnight for good measure), I ran to my computer and printed the words "A Christmas Wish" in a fancy little font and cut it out in banner style - distressed the edges and used distress ink on it for a worn vintage look.  Next, the star...easy peasy.  Using the same scrap of white cardstock I used for the banner, I die cut a star, stamped it with a music stamp and distressed it using black soot and vintage photo distress ink.  All I needed was a little doodad as an accent.  I coated a scrap piece of plastic leaf stem - using Crystal Lacquer and my gold/silver glitter mixture.  When I glued the whole thing together - I used a glue gun for speed - I added 3 tiny vintage glass ornaments from my stash and I was done and very pleased with the outcome.

Update:  I've been asked to make more for the other gals at the party that didn't get my ornament! 

Hope you take the time to make some creative magic this holiday!

Make sure you check out the amazing creations our Design Team has made -

And visit Sakura's website for product info and more inspiration! -

Till next time....stay creative!


Tuesday, November 22, 2011

Birdhouse Fun!


The Route 66 stamp from Viva Las Vegastamps! was my inspiration this week for this cute little birdhouse ornament.


I started with some basic supplies:

Route 66 stamp from Viva Las Vegastamps!
Wooden Birdhouse Ornament
Scrapbook paper scraps
Vintage Gold Fine Glitter
Distress Ink - Vintage Photo
Distress Crackle Paint - Rock Candy

I cut scrapbooking paper just a tad smaller than each side of the birdhouse - distressed each edge and glued it down using 3D Crystal Lacquer.  I inked the edges with Distress Ink in Vintage Photo to give it a rustic look and to take away the new look of the wood.

For the roof - I used paper that had small license plates (Tim Holtz) which look like shingles and gave it a coat of Rock Candy Distress Crackle to make it look aged.  At the bottom I added a layer of Gem Particles and finished off the bottom edge with fine glitter.  The stamped image was stamped and embossed, cut out and aged with Distress Ink in Old paper and Vintage Photo.

This was a fun FAST project!

For more creative inspiration - visit Sakura Hobby Crafts blog
and for product info, check out

Enjoy!


Tuesday, November 8, 2011

Summer Memories Vintage Tag


This month I'm featuring a stamp from VivaLasVegaStamps! along with Sakura Hobby Craft products!  I created this fun vintage beach tag using the following items.

Manila Tag
Scrapbook paper scraps
Flourish rubberstamp - Tim Holtz
Film Strip Ribbon - Tim Holtz
Vintage Ticket sticker
Hinge Clip - Tim Holtz
charms from my stash
Distress Inks - Old Paper & Vintage Photo


I started with distressing the edges of the manila tag using distress ink.  I cut my scrapbook paper scrap the size of the tag and distressed the edges using a Zutter Distrezz It All to really rough up the edges and make it a little smaller than the tag.  I stamped the girl image on plain white cardstock using black distress ink and embossed her with clear embossing powder.  I aged the white cardstock with distress ink in old paper and vintage photo on the edges.


I stamped a flourish image over the scrapbook paper using StazOn ink in black and outlined some of the flourish with brown Crystal Color Lacquer.  I set this aside for a few hours before I finished assembling the tag.


Creating the film strip was a little time consuming - but turned out really cool!  I just cut small face images from scraps of scrapbooking paper - here I was using Graphic 45's Bathing Beauties - one of my all time favs!  I placed a dot of Crystal Lacquer on top of the image and then pressed the film strip over it.  To finish the tag, I adhered a vintage ticket sticker behind the clipped on film strip ribbon and added some fun charms.

You can find amazing rubberstamps from VivaLasVegaStamps! here

Visit Sakura Hobby Craft's website for product info & project ideas.

and visit Sakura's Blog to see all of their design teams creations!

Have a great week!