Tuesday, December 27, 2011

CHEERS!


This week's project is quick and easy....and a great way to dress up your decor for any occasion! 

Materials Used


That's it!  I said it was quick and easy!


It's very important to work on a non stick work surface.  I use a craft sheet from Ranger.  I placed the pine tree sticker on the craft sheet and then went to town with my colored Crystal Lacquer.  I used 2 shades of green for the tree and a brown for the trunk and just filled in the blank areas.  I let it sit overnight.......very important here.  Once it's completely dry, it peels right off the craft sheet and almost has a vinyl window cling feel on the back.  In fact, I was able to move it several times to make sure it was straight.  This is such a great idea to turn an ordinary clear glass votive holder, wine glass, vase - virtually anything into a very nice addition to your decor or party theme.


Here are the same stickers on a votive candle holder......cute!
I added some plain gold stickers in the background for a little more interest.....love it!

Here's wishing you a very Happy New Year!

and 'till next time......stay creative!

Visit Sakura's amazing blog here

Find out about all their amazing products here


Tuesday, December 13, 2011

A Christmas Wish


Believe it or not - I created this ornament in about 30 minutes - beginning to end.  Fortunately, I had time to let it dry overnight, before it and me ran off to a Christmas party and ornament exchange..... 

Materials Used

1 vintage glittered star
white crepe paper streamer
gold and pearl glimmer mist
gold and silver find glitter
white cardstock
music rubberstamp
distress inks in vintage photo, tea dye & black soot

I was in a pinch - invited to a party & ornament exchange and make some creative goodness for my design team assignment.  I had these vintage star ornaments arranged in a glass bowl as part of my Christmas decor - and a bottle of Crystal Lacquer...what more could a girl ask for?
I made the rosette using simple white crepe paper streamers using about an arms length doubled - that took like 2 minutes!  I'm doing good!  Sprayed it with a little gold and pearl glimmer mist and hit it good with my heat gun.  Next, I poured a good amount of Crystal Lacquer on a paper plate and mixed gold and silver glitter on another.  I dipped the edge of the rosette into the Crystal Lacquer and then dipped in into the glitter mixture - so pretty!


While I set that aside to dry (it did dry in just a few hours, but I left it overnight for good measure), I ran to my computer and printed the words "A Christmas Wish" in a fancy little font and cut it out in banner style - distressed the edges and used distress ink on it for a worn vintage look.  Next, the star...easy peasy.  Using the same scrap of white cardstock I used for the banner, I die cut a star, stamped it with a music stamp and distressed it using black soot and vintage photo distress ink.  All I needed was a little doodad as an accent.  I coated a scrap piece of plastic leaf stem - using Crystal Lacquer and my gold/silver glitter mixture.  When I glued the whole thing together - I used a glue gun for speed - I added 3 tiny vintage glass ornaments from my stash and I was done and very pleased with the outcome.

Update:  I've been asked to make more for the other gals at the party that didn't get my ornament! 

Hope you take the time to make some creative magic this holiday!

Make sure you check out the amazing creations our Design Team has made -

And visit Sakura's website for product info and more inspiration! -

Till next time....stay creative!


Tuesday, November 22, 2011

Birdhouse Fun!


The Route 66 stamp from Viva Las Vegastamps! was my inspiration this week for this cute little birdhouse ornament.


I started with some basic supplies:

Route 66 stamp from Viva Las Vegastamps!
Wooden Birdhouse Ornament
Scrapbook paper scraps
Vintage Gold Fine Glitter
Distress Ink - Vintage Photo
Distress Crackle Paint - Rock Candy

I cut scrapbooking paper just a tad smaller than each side of the birdhouse - distressed each edge and glued it down using 3D Crystal Lacquer.  I inked the edges with Distress Ink in Vintage Photo to give it a rustic look and to take away the new look of the wood.

For the roof - I used paper that had small license plates (Tim Holtz) which look like shingles and gave it a coat of Rock Candy Distress Crackle to make it look aged.  At the bottom I added a layer of Gem Particles and finished off the bottom edge with fine glitter.  The stamped image was stamped and embossed, cut out and aged with Distress Ink in Old paper and Vintage Photo.

This was a fun FAST project!

For more creative inspiration - visit Sakura Hobby Crafts blog
and for product info, check out

Enjoy!


Tuesday, November 8, 2011

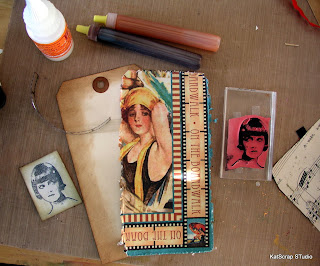
Summer Memories Vintage Tag


This month I'm featuring a stamp from VivaLasVegaStamps! along with Sakura Hobby Craft products!  I created this fun vintage beach tag using the following items.

Manila Tag
Scrapbook paper scraps
Flourish rubberstamp - Tim Holtz
Film Strip Ribbon - Tim Holtz
Vintage Ticket sticker
Hinge Clip - Tim Holtz
charms from my stash
Distress Inks - Old Paper & Vintage Photo


I started with distressing the edges of the manila tag using distress ink.  I cut my scrapbook paper scrap the size of the tag and distressed the edges using a Zutter Distrezz It All to really rough up the edges and make it a little smaller than the tag.  I stamped the girl image on plain white cardstock using black distress ink and embossed her with clear embossing powder.  I aged the white cardstock with distress ink in old paper and vintage photo on the edges.


I stamped a flourish image over the scrapbook paper using StazOn ink in black and outlined some of the flourish with brown Crystal Color Lacquer.  I set this aside for a few hours before I finished assembling the tag.


Creating the film strip was a little time consuming - but turned out really cool!  I just cut small face images from scraps of scrapbooking paper - here I was using Graphic 45's Bathing Beauties - one of my all time favs!  I placed a dot of Crystal Lacquer on top of the image and then pressed the film strip over it.  To finish the tag, I adhered a vintage ticket sticker behind the clipped on film strip ribbon and added some fun charms.

You can find amazing rubberstamps from VivaLasVegaStamps! here

Visit Sakura Hobby Craft's website for product info & project ideas.

and visit Sakura's Blog to see all of their design teams creations!

Have a great week!


Tuesday, October 25, 2011

Wicked Fun with Crystal Lacquer


This week Crystal Lacquer and I had fun creating one more Halloween decor piece for my collection - a wickedly cute mini witches hat!

Materials Used

Paper Mache Witches Hat
White embossed wallpaper - thank you Becky Conley :)
Assorted Glimmer Mist
Paper Flowers from my stash
Scrapbook paper - Halloween theme
Old dictionary pages
Colored glass ornaments in Halloween colors
Assorted glitters
Brads - for flower centers
Assorted Beads
Halloween Tulle Fabric

I started by covering the paper-mache hat with embossed wallpaper.  In the photo, you can see that I had cut off the top part of the hat - my project started off in one direction and took a turn midway - and decided to glue the top back on.  Funny how that works when you have an idea in your head of how you want something, and then "poof" right in the middle of creating, you change your mind.  I love that part of the process and it didn't bother me at all to have to change directions.  Anyway, I sprayed the entire hat with glimmer mist - in Raven.  It has a very cool purple shimmer when dry.


Here's a close up of one of the flowers.  I love this photo because you can see the purple shimmer on the hat from the glimmer mist.  I bought a package of small glass ornaments in Halloween colors.  I wanted to see what fun I could have adding glitter/beads to them using Crystal Lacquer.  This green one was covered with fine green glitter.  I did another one in chunky beads that turned out cool - and will be using it for another project.  It was easy to brush on a thin layer of Crystal Lacquer and then just dipping them in the glitter or beads. 


For the center of this flower, I coated a black glass ornament with chunky orange glitter.


For center of this paper flower, which I made using old dictionary paper and orange and black glimmer mist, I used Crystal Lacquer and orange seed beads.  I coated a brad with the lacquer, dipped it in the beads and set aside to dry.  I did this process twice as to get a bigger layer of beads.


 I used my scallop circle Accucut Die and cut about 8 circles of Halloween themed tulle fabric to create this little number.  The edges of the tulle were melted  (I used a lighter)  so they would curl up and make it more dimensional and added a brad that I coated with Crystal Lacquer and orange chunky glitter.


Here are my Crystal Lacquer creations for this Halloween - I can't wait to start on Thanksgiving and Christmas next :)
 

Till next time - stay creative!

and please visit the Sakura Hobby Craft Blog and website
 for more creative inspiration and product information.


Tuesday, October 11, 2011

Halloween Wand with Crystal Lacquer


This week I decided to add to my Halloween decorations and make a Halloween Wand that coordinates with my last post - the Halloween Treat Cone.

Supplies Used

Black Crepe Paper Streamer
Asst. Ribbons in Halloween colors
Scrapbook papers - Halloween themed
Orange chunky glitter
Distress Ink - Black
Wooden Spoon

I started out with a simple black crepe paper rosette.  I sprayed it with Glimmer Mist (black with purple glimmer), but it didn't show up that great and most of it did get covered, however it does have a little bit of a shimmer to which is pretty cool.


Adding a glitter edge to the rosette is simple, and it gives it a more vintage feel.  First, I dipped it onto a paper plate which I had poured a generous amount of Crystal Lacquer.  Second, I dipped it into a mound of orange glitter that I had poured onto a second paper plate in a rolling motion. 


        I absolutely LOVE the way it turned out! 

     
I also did the same process using Gem Particles from Sakura on the smaller scrapbook paper rosette that I made using the Tim Holtz Rosette Die.  It came out super sparkly and chunky.  Both of these methods dried pretty quickly, so I was able to complete this whole project in just over an hour.


I added this cute little frog on one of the ribbon streamers.  It was a cardstock cut out that I simply used crackle medium on, then gave it a coat of Crystal Lacquer for more shine.  To complete the project, I wrapped ribbon around a wooden spoon, (the reason I used a spoon instead of a dowel was that I found it was MUCH easier to glue down the rosette onto something sturdy - the spoon part -  rather than using just a dowel) glued the rosette onto a purple glitter chipboard vintage shape and added a little paper tab to the rosette.  The skeleton face was cut out from a scrap I had left over from my last project and coated  with Crystal Lacquer. 


Here is the completed wand, set in a witches shoe for the pictures sake.  To the bow, I added a charm that I made using a Black Jewelry Finding from Sakura.  I simply glued a picture of candy corn in the charm and covered with Crystal Lacquer and a sprinkling of fine clear glitter.  Also to the wand, I added a journaling tag that can be filled with all the fun Halloween memories and maybe a photo or two that can be brought out and displayed year after year!  Right now, it's part of my Halloween display!  This was a super fun project and I hope to hear that you made one yourself!  Share with me if you do!


As always - stay creative!


Find more fun projects AND products at Sakura's website - www.sakuracraft.com

and visit the Sakura Craft Blog and join the fun!


Tuesday, September 27, 2011

Halloween Treat Cone

Fall has arrived here on the mountain....leaves are changing color and nights are getting cooler.  Boxes of Fall decorations are being brought out from storage - which means one thing - Halloween!
I adore Halloween decorating (and I must admit the candy!) so I'd thought I would share a Halloween themed post to get a jump on all of Halloween's goodness. 


I used vintage sheets of music for the cone, and old dictionary paper for the flower.  This project is really fun because you can use whatever papers you have on hand to coordinate with any theme you would like!


I used a paint brush to apply Crystal Lacquer to the scalloped edge of the cone and sprinkled it with orange glitter.


After the glitter was dry, I rolled the cone into it's shape and used Crystal Lacquer to adhere it.


To make the flower,  I used 2 scalloped circles of old dictionary paper, crumpled them up several times and sprayed them with several layer of Glimmer Mist. 

I used this little guy for the center of my flower.  Here he is coated in a nice thick layer of Crystal Lacquer.  I sprinkled a little fine clear glitter onto the wet Crystal Lacquer and set him aside to dry.


I used a Tim Holtz stamp for the ticket, stamped it with black Distress Ink and embossed it with clear embossing powder.  To color it, I used Crystal Color Lacquer.  I squeezed a little out in a puddle on the side of the stamped image, and used an old giftcard to scrap it across it.  I used both purple and orange Crystal Color Lacquer.


Here you can see how awesome the ticket turned out.  After it dried, I distressed the edges using a distressing tool and black Distress ink.  I used a Dymo Label Maker to make the "BEWARE" label and stapled it to the flower,  shredded some black paper in my paper shredder and used it to fill the cone.  For the finishing touches, added some black ribbon for hanging and filled it with some candy corn!

Till next time....stay creative!


Please visit Sakura Hobby Craft for more info on their products

Find more creative inspiration at Sakura's Blog


Tuesday, September 13, 2011

"Let's DO this" ATC Card

I had the privilege this past weekend to spend some time with some amazingly creative ladies at the Creative Souls Retreat in beautiful Lake Arrowhead, CA.  One of the fun activities we did was an ATC Swap.  The theme was transformation - and here is my spin on that theme.
 Since I had to make multiples - I wanted something fairly simple, but I didn't want it to necessarily LOOK simple. After deciding on my design and image, I immediately reached for my 3D Crystal Lacquer and my 3D Crystal Lacquer Color


Here's the image I started with - printed on cardstock.


I love this photo.  It really shows the sparkle you can create with a simple layer of 3D Crystal Lacquer and a sprinkle of glitter.  Here I used an Ultra Fine Clear Glitter by Hero Arts.  Any glitter will work perfectly.


I also used 3D Crystal Lacquer Color in blue to add dimension to the butterfly. After letting it dry overnight, I added the words "Let's DO this" using my underwood font and printed out on copy paper and a little green bling on the girl's wing!


Finished ATC's all ready to trade!


To find the products used in this post - please visit


and please visit and follow www.crystallacquer.blogspot.com for more info and fun projects shared by the Design Team!

Thanks!

Saturday, August 27, 2011

Exciting News!


I'm very excited and honored to announce
that I will be joining the next
Sakura Hobby Craft Design Team!
I have had such a blast creating projects and sharing them with everyone, and I get to do it for another 6 months - YAY!


Here are the other wildly talented Design Team members - just click on their names to get to their blogs - don't forget to follow us all!

Our fearless leader:

Design Team Members:


Thursday, August 25, 2011

Quick Crystal Lacquer Charms

I'm sharing with you today 2 quick and easy charms ideas.  Gift giving season is quickly approaching and with a bottle of 3D Crystal Lacquer, a package or 2 of Glass Tiles, Bales and Ball Chain Necklaces and a little imagination you can pretty much take care of several gifts in just a short amount of time.


For this first charm, I applied a thing layer of Crystal Color Lacquer on the back of the glass tile.  The glass tiles DO have a right and wrong side.  The back has a slight texture to it and isn't as shiny.  I let this dry overnight.  For the initial - I used a permanent black marker on white cardstock, let it dry and used Crystal Lacquer to glue the tile (colored side down) over the initial.  Again I let this dry overnight, then trimmed around the glass tile.  On the back, I glued some typed words and gave it a coat of Crystal Lacquer....let that dry and added the bale.


For this second charm, I stamped an image onto the back of the Glass Tile and used Crystal Lacquer to glue the tile onto printed scrapbooking paper.  After it was dry, I trimmed around the edges and wrapped metal foil tape around it to give it a soldered look.  I added some printed words on the back and gave it a good coat of Crystal Lacquer.  When it had dried overnight, I added the bale.


String the completed charms on a ball chain necklace and ta da! 

Find more ideas and tips for Crystal Lacquer and the jewelry findings used here at

And you can follow Sakura's Blog and see more fun projects and ideas at

Until next time......stay creative!