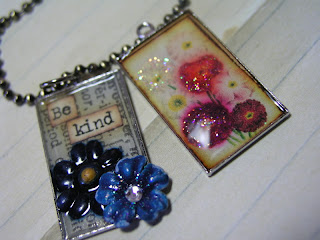
I love all things vintage - so when I was sent charm blanks from Sakura Craft Hobby for this months Design Team projects , I knew the end result would be something 'vintag-ie'. I had SO much fun making my own charms - that well, I'm still making more designs ,and I can't seem to stop!
In the photo below, you can see the items that I used to complete this weeks design: 3D Crystal Lacquer, Crystal Colored Lacquer and silver charm blanks by Sakura Hobby Craft, Tim Holtz's Tissue Tape and Vintage Photo Distress Ink, fine glitter, a few itsy-bitsy flowers, a vintage pic and a few words printed on white cardstock.
For my "Be Kind" charm, I tore off a piece of the tissue tape and stuck it to the bottom of the blank charm - it's nice and tacky on the back, so it laid down nicely inside the charm. I just trimmed off any excess that hung over the edge. I cut out the words Be Kind from the cardstock, inked their edges with Vintage Photo distress ink and used the Crystal Lacquer to adhere them to the charm. Next, I took the dark blue tiny flower and used Crystal Lacquer to adhere it inside the charm. I kind of flattened it down with my fingers so it would lay flat, then grabbed my 3D Crystal Lacquer and filled in the whole charm.
Then the hard part - waiting! I let it sit overnight - and in the morning is was clear, shiny and beautiful!
For a little added interest, I covered a second tiny flower with Crystal Colored Lacquer in blue - sprinkled a little fine clear glitter on it and set it aside to dry. I added a small clear rhinestone in the center and attached the dried flower to the top of the charm with Crystal Lacquer - ta da!
For the old-fashion floral charm, I simply printed out a an image on white cardstock, trimmed it to fit the charm, distressed the edges and inked them with Vintage Photo distress ink. I used the Crystal Color Lacquer in ivory, red and purple to cover 3 of the flowers and sprinkled them with fine glitter and set aside to dry - then filled the charm with 3D Crystal Lacquer . It's such a quick and easy process - but the result is just beautiful! Just be patient and let the Crystal Lacquer dry! I let this one set for several days to be sure it was completely dry.
I just love the vintage feel of these charms. I think they make a perfect addition to my charm necklace that I made at the Idea-ology Booth at CHA in January.
Karen
For more information about Crystal Lacquer products,
check out www.sakurahobbycraft.com , and
visit their blog www.crystallacquer.blogspot.com for more creative inspiration!


3 comments:
Love the use of the flowers, how super cute are these?!
So adorable!
Post a Comment